Thursday, November 8, 2012

Gauge Challenged

Did I say I was gauge challenged?  If not, the secret is out now.  Achieving gauge with a swatch and duplicating it in a project is a skill that eludes me.  A swatch may match the recommended stitch count but matching it in the project is rare.  If I easily achieve stitches per inch, the row count is next to impossible.  My only hope is that the row count is not a required element.

Zuzu's Petals is an easy and fast knit if everything works out right.  I met the stitch count per inch with size 9 circs but somewhere before joining in the round for the neck opening, I realized my big head just wasn't going fit because the opening was dependent on row gauge.  I made a change to smaller needles because the finer yarn version has more row repeats and the worsted weight yarn I was working with was finer than most.  Switching needles worked so I went with the pattern repeats for more petals. 

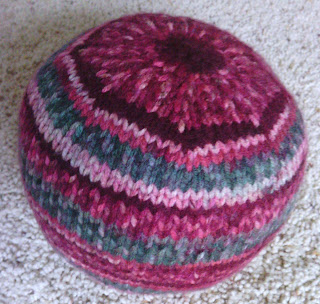
Eventually, it became apparent that I might not have enough yarn.  The last pattern rounds I dared to knit were numbers 31 and 32, followed by a round to form points on the petals, and then a round of purling to control curling before I fiddled with binding off.  Ending my project was an easy solution to my diminishing yarn until I saw an error in the center back in round 32.  I figured the beauty of my yarn deserved perfection.

Un-knitting was tedious but only 4 rounds.  Perfection was not to be had.  After 3 attempts trying to achieve a loose bind-off and finally succeeding with a single crochet version, I found a dropped stitch in the lace around a petal.  At 1 a.m. one doesn't have any reserves or patience for back-knitting so I declared the project done and went to bed.  The slightly larger lace hole and missing stitch doesn't show but I know.  SIGH!!
 
The cowl was blocked this morning.  Pinned to a pressing mat, sprayed with a mixture of water and Shaklee's liquid fabric softener, and then blasted with the heat of a hand-held hair dryer; the edges have just a faint ripple that goes nicely with the texture of the lace pattern knit too tightly, something I found attractive.  The cowl is warm and soft with a beautiful painted pattern.  It will dress up a number of turtlenecks in my wardrobe.

https://blogger.googleusercontent.com/img/b/R29vZ2xl/AVvXsEjqOqrzOP0sOvR3nJePhQio2E6DCbBOZ-VBuHYx4kLkHgxDRbqh7R1GJhAzNOuQrFUT2kv5bG3-UrscNlHE9TWCgvyO1YL3x7oj-Y_HTuVcXnQLFfb6psZfUamY-HyyTvfIYlI1fWybIVQo/s512/Petals%2520Cowl.jpg

Sunday, October 28, 2012

BIG B, little b: What begins with B?

Baby's ball!
https://blogger.googleusercontent.com/img/b/R29vZ2xl/AVvXsEhqaAhvk_O_DpXWyoeRueVRiBxmIZi54xf1cRasHN37GiGRRB9GIsTAcw-pdnpom6lecAUVhjJFwgFfKM9O1oskd7pHxpihFGOP4w_eQkA8FNVUn2PdAa1bE3ztXOZ6ur5Xqc9gUec-UVsJ/s512/Ball1.jpg
With fond memories of a crocheted ball a neighbor made my children when we lived in NE Portland in the '70s, I went looking for a pattern to knit a ball for my youngest grandson.  My search took me to Judy O'Brien's free pattern.  Her pattern is for sock yarn but with a couple of modifications, I thought it might work in this lovely self striping worsted that is virtually fuzz free.  After making the first ball, my own pattern emerged so I am offering it for you all to try. 

Finished Size:  About 18 inches in circumference

Supplies and Notions:
Self striping worsted weight and fuzz free anti-pilling yarn*
US 6 needles (double points or 2-24 inch circulars)
One or two stitch markers
Tapestry needle
Polyester Fiberfill
Gauge:

5-5 ½ spi  (specific gauge is not important, only that it is very tight so baby cannot pull out fiberfill)

Instructions:
Using Emily Ocker’s cast on: CO 4 stitches and divide evenly onto 2 circular needles, leaving an 8 inch tail.

All even rounds are knit.  Use a stitch marker to designate beginning of round.
Rnd 1:  K1fb around (8 sts)
Rnd 3:  K1, M1 around (16 sts)
Rnd 5:  K2, M1 around (24 sts)
Rnd 7:  K3, M1 around (32 sts)
Rnd 9:  K4, M1 around (40 sts)
Rnd 11:  K5, M1 around (48 sts)
Rnd 15:  K6, M1 around (56 sts)
Rnd 17:  K7, M1 around (64 sts)
Rnd 19:  K8, M1 around (72 sts)
Rnd 21:  K9, M1 around (80 sts)   
Rnd 22:  Place a stationary marker at the beginning of round and knit even for about 26 rounds.

Decrease to close ball.  All even rounds are knit until round 18. 
Rnd 1:  K8, K2tog around (72 sts)
Rnd 3:  K7, K2tog around (64 sts)
Rnd 5:  K6, K2tog around (56 sts)
Rnd 7:  K5, K2tog around (48 sts)
Rnd 9:  K4, K2tog around (40 sts)
Rnd 11:  K3, K2tog around (32 sts)
Rnd 13:  K2, K2tog around (24 sts)  Start stuffing ball with fiberfill.
Rnd 15:  K1, K2tog around (16 sts)  Continue stuffing ball.
Rnd 17:  K2tog around (8 sts)  Make sure ball is firmly filled with fiberfill.
Rnd 18:  K2tog around (4 sts)

Cut yarn, leaving an 8 inch tail.  Run yarn through the loops with a tapestry needle and remove knitting needles.  Pull yarn tight and run through loops again to fasten off.  Hide end inside ball.


*I Love this Yarn! from HobbyLobby or Deborah Norville Everyday Soft Worsted are good easy care choices for this project.


Monday, October 15, 2012

Another Pumpkin Joined the Patch

Jack-o'-Lantern Bib

I have been waiting for the opportunity to make this bib.  It's fall, I love faces on pumpkins, and my little 9 month old grandson looks great in orange so with a little free time on my hands, I just had to whip it up.   Indy will be with me on Friday so maybe we'll even have a live model for a photo shoot. 

The design of the neckline is particularly practical since the bib extends to shoulders but tapers in for the chest.  When Indy turns his head, he won't rub food on his shirt, a problem I have noticed with the design of the bibs he currently wears.  I intend to incorporate this design feature into future longer bibs with food pockets for everyday wear.  If you need a freebie bib to embellish for the holidays, there are plenty on the internet.  You might check out this blog for more ideas and a pattern:  Just Another Hang Up

This Jack-o'-Lantern Bib pattern is also in Quick Creative Quilting, a book I have had on the shelf for years.  The book currently appears to be a bargain at Amazon so for the price of shipping, you would have many more patterns than just the one for the bib.  And please note that the neckline runs small on this pattern. 

Update:  I just found another great bib pattern in a Sew Daily freebie.  It runs longer, with a larger neck opening (and some cute fruit and veggie appliques); perfect for the toddlers on your sewing list:  Sew Daily (4 Free Easy Sewing Patterns)

Monday, September 24, 2012

Pumpkin Patch Hats

Callum's Hat

Helen's Hat

Indy's Hat
The family is gathering for a fall cookout and all the little ones have pumpkin patch hats.  Callum's hat is Rib-A-Roni:  http://www.ravelry.com/patterns/library/rib-a-roni

From some of the comments on Ravelry, there were a few that said Rib-A-Roni ran small.  I made the youth size making gauge at one rib per inch for a 3 year old and it is small.

Helen's Hat is Spiralini adapted for an 18 month old:  http://www.ravelry.com/projects/myshellyknit/spiralini-hat

This one runs large due to the slouch and my gauge.  I started with 72 stitches (4 spi) in the ribbing and then increased to 80 stitches for the body, knitting even for a total of about 5.5 inches for the length before decreasing.  The decreases are based on a 10 stitch repeat so there were no further changes.  If I had been thinking, I could have changed the swirl to a 8 stitch repeat.  That would have resulted in more sections but the swirl lines would have lined up with the ribbing like the designer's.  Helen's curling vines are crocheted.

Indy's hat is has a roll brim with 64 stitches (4 spi).  After the 2 inches of deep orange in stockinette, there is an 7x1 rib (knit 7 stitches, purl 1).  Total length before decreasing, is 5 inches.  This hat runs a bit small for this 9 month old but I have enough yarn to make another one for next year.  ;)

Hopefully, Callum's and Helen's hats will fit and we'll have a Pumpkin Patch Kids picture.

Update:  The day for the cookout was too warm for hats.  Callum politely refused to pose with Helen and Indy, so the picture below is my consolation.  Callum's hat ran small and Helen's is a bit large, most likely she will be able to wear hers next fall, too.

Tuesday, August 28, 2012

I Dyed for Fishy

KoolAid dyeing in a crockpot is fun and easy.  Colors that are analogous (next to each other on the color wheel) will blend better with less muddying.
Brew mix.


Dye before setting to brew (yarn soaks and heats in 2 cups white vinegar and water to cover yarn, dye is added when hot).
Squirt bottles used to insert dye in water bath.
Brewed yarn:  Water turns clear or milky in the hot bath when the yarn has absorbed all the dye.
3 oz. of dyed Lion Brand Fisherman's Wool
Fishy (free pattern from Delicious Stitches) before swim.
Fishy after swim, drying in front of a small fan.
Fishy took some hard hits but with a little reshaping, he is looking much better. 

Tuesday, July 31, 2012

Can this be knitting?

Yarn Bee Chrysalis in Bog Copper from Hobby Lobby
Netted ribbon yarn is not my fiber of choice but I accepted the challenge of a friend and now a scarf of layered ruffles is falling from my needles.  The work is tedious with each loop having to be spread open to hook it with the knitting needle to become the next stitch.  Don't drop a stitch, picking them up is a challenge if not impossible.  I started over, once, already.  See if I do another one!

Dilemma: Ready to Felt/Full?

16"x16" in Full o'Sheep Yarn
My Amish Jewels version of the Painted Diamonds Bag is ready to felt/full.  I-cord handles have been twisted and tied with a square knot.  Should I leave them twisted or undo them and twist them after the bag has been processed?  I am leaning towards leaving them twisted through the water bath.  Any thoughts or recommendations from experience?

Update:  Today, August 28th, was felting/fulling day.  The bag was processed with the handles twisted.  They didn't stick to the bag and they can be separated to be twisted again.  Some thought they might untwist with the vigorous agitation.  They may but they are just as likely to twist more.

Also, some recommended securing the handles with additional stitches.  I did this and I tied them before twisting.

Bag is now 13.75 inches wide by 13 inches tall.

Handles stretch when hung damp to dry.

Thursday, July 12, 2012

Sticky Situation

I was blessed with a Singer Puzzle Box a week or so ago but something sticky had adhered to the surface.  From a telltale hair and previous experience with a Singer 128 from a barn with similar spots inside the base, I suspected mouse droppings.  To remove the rather large splotches in the 128 base, I soaked them with oil and scraped with a putty knife.  To cover the oily spots, I put in a nice new piece of black felt.  That process wasn't going to work for a nice looking Puzzle Box with a decent finish.
The picture above shows the worst of the droppings and two spot faintly circled in red that were test spots for cleaning products. 
Since I had used oil on the Singer 128 base, I thought maybe something oily might work but it had to have more solvent action than just oil.  Since the Treadle On members are adept at cleaning old treadles stored in unusual places, I asked for suggestions.  Murphy's Oil Soap, Paul's Elixir (a specialty home brew that seems to work similarly to Dr. Woodwell's)*, and OxiClean.  I put Paul's Elixir as a last resort because it will soften the finish on the wood and redistribute it.  If the droppings were embedded in the finish, I would need to use it to blend in the spots where the finish lifted.

I didn't have any Murphy's Oil Soap and I was afraid the oxygen peroxide created by mixing the OxiClean in hot water would cause discolorations.  So, looking through my own multitude of cleaning products for an oil base cleaner that would act like the wood oil soap, I turned up two, Ultra Krud Kutter and De-Solv-It.  I tested both but the organic De-Solv-It was more effective at softening the spots.  Even so, I still had to lift them with a flat blade screw driver and then smooth the area with fine steel wool.  They came off, but they took some of the finish with them.  Eventually, I will have to use Paul's Elixir to restore the finish but since the biggest spot is on the section that is usually sitting on the bottom when the emblem is upward, the box is now nice enough to display in my office near the Singer treadle cabinet.
*Note:  Paul Hayes (the Fenman) has an extensive article at Needlebar.org.  Chapter 4 of the article specifically demonstrates The Elixir while to rest of the article is worthwhile for understanding the pros and cons restoration. 

Sunday, July 8, 2012

Finger Wiping Good!

With a head cold and tons of laundry to do, I tried to take it easy between loads.  This little towel sort of fell off my needles.  Later, with the laundry done, I sat in the sun to appreciate our recent appearance of summer sunshine and finish off the towel.   Now, that is what I call a productive but relaxing day!

I wanted something reversible that would work as a gift for the kitchen or bathroom with coordinating dishcloths or facecloths.  After a false start with another smaller towel freebie, this pattern developed.  It seems to have enough texture to be absorbent and is approximately the size of a guest towel (fingertip towel).

Download the free pattern:  Stepping Stones Fingertip Towel

Monday, June 25, 2012

From Dishcloth to Duster


I have some wonderfully soft cotton yarn from Hobby Lobby (I Love this Cotton).  It is just too nice for a dishcloth but a facecloth would be perfect.  Searching high and low through Ravelry and the cotton yarn sites for patterns just didn't turn up what I had in mind and the ridged dishcloth pattern I had made a few years ago, was just not to be found either in my files or on the internet.  So with a few frogged starts, a simple knit two rows, purl two rows ridge with a 3 stitch border became a facecloth with a delightful texture.  


With a good stash of firmer Peaches and Creme cotton on cones and an older simple Swifter sitting idle, in need of recyclable duster covers, I set out to use the same ridged pattern for my mop.  I cast on 70 stitches with a gauge of 4 stitches per inch and knit until there was enough to extend the width of the foam head.  Centering the mop head on the knit band, I folded over each end and stitched them to the bound edges to form pockets to fit the head snugly.  The duster head goes on great now but I am concerned it will shrink when laundered.  The next duster cover will be from the stash of acrylic yarn I didn't give away on FreeCycle before I moved.

Tuesday, June 19, 2012

Acrylic: To Block or Not To Block?

With DH gone for a week to do some mountain climbing, I settled in to to do some serious knitting.  With 3 days of concentrated effort, a Babies and Bears Sweater is off the needles, blocked, and ready for me to make a trip to the fabric store to find the perfect buttons.

Plymouth Encore yarn doesn't seem to be readily available in my shopping district so I had settled for Lion Brand Vanna's Choice, an acrylic/rayon blend.  With no previous experience with this yarn, I was pleasantly surprised.  The sheen is lovely and the hand delightful.  

With a few modifications to the pattern, the sweater will look great for winter with a cute hat.  The original pattern results in a shorter sweater with a hood but opting to join the two halves of the sweater before adding the front panels (substituted garter stitching in place of the Gansey pattern for both fronts and the back), I was able to lengthen the sweater buy 7 rows and continue the mitered corners.  I also chose to create a stockinette button placket that curled in spite of the garter stitches along the edge and I replaced the hood with a collar so baby can wear a wardrobe of cute knit hats.  ;)

With an obstinate curl along both button plackets, I had a dilemma, try blocking the acrylic yarn or let the buttons hold the placket in place.  Acrylic yarn can be killed by too much heat, but after consulting with the experts on the Yahoo knitlist and some Googling, I was sure I could cure the curl.
Uncontrolled, the lower placket rolled all the way over on itself.
My Rowenta hand steamer is still lost in the maze of moving boxes and it has had an obnoxious drip since it was new and gifted to me.  I decided not to hunt for it.  The Sunbeam steam iron was a better drip-free choice.

Filling the iron with water and setting it for the maximum burst of steam, I practiced on the gauge swatch, hovering the iron above about an inch.  First error was to steam from the right side but a test wash and toss in the dryer showed promise.  The swatch retained its now flattened edges.

Encouraged by the permanent results, I placed the sweater on my pressing surface, wrong side up and proceeded to cover the areas that I did not want hit by steam with cotton hand towels.

Working carefully, I successfully flattened just the button plackets and a small area in the back that was riding up slightly.
Don't worry, both fronts are exactly the same size.
Now, with the success of blocking acrylic yarn, I will be more willing to use it for future projects.  The only thing I won't do again is use that collar!  I followed the instructions for the shaped collar in the Baby Surprise Jacket pamphlet.  I like the idea of creating fullness for a roll line but the points are just not appropriate for a baby sweater.  They look more like a shirt collar or worse


Tuesday, May 29, 2012

Re-engineering the Mason Dixon Hand Towel

It has been my intent to make a Mason Dixon Hand Towel to give with some dishcloths, but the button on the tab bothered me.  It isn't in the center.  The designers use an even number of stitches to create the mitered towel and the tab.  An odd number of stitches would allow for a larger buttonhole to be centered easily.  Also, they start at the bottom up and work to the tab.  

If I can get away with starting with fewer stitches to cast on and count, I will.  So, last Friday, while dear grandson took some longer than normal naps, I set out to re-engineer the hand towel.  The tab is 9 stitches with a 3 stitch, one row buttonhole and then from there, I more or less just looked at the picture and went with appearances rather than attempt to use the instructions to count backwards to make the same number of increases to mimic their towel from the top down.  I used 12 rows of stockinette with 3 ridges of garter stitch in between.  It was an easy project, off my needles by Saturday afternoon.  Now to find the perfect button, maybe a daisy, ladybug, or frog. 

Monday, May 21, 2012

How Did That Happen?


This started out as a project to use up wool scraps but suddenly I was spending just over $18 dollars at Craft Warehouse for more wool yarn to coordinate with just the blue and variegated Kool-Aid dyed scraps for a yarn basket or bag that could sit in my living room without clashing with the decor.  Now I have more leftovers to use up. 


This project was a learning experience.  I have wanted to try felting/fulling a knit project and knitting basket/bag seemed perfect.  My past projects were either unintentional or a sample flat knit that has now qualified for potholders.  After searching Ravelry for felted bowls and baskets, I settled on A Petite Felted Bag by Ann LimWanting a bigger version, I began with the 4 stitches/8 sections on the bottom but increased until I had a round base of 128 stitches and then worked upwards as instructed.  

I hit the panic button when I realized that the rather wimpy Cascade 220 worsted weight yarn was too fine to felt into a sturdy basket with only a single strand as instructed by the pattern.  A Google search turned up another bag with a round base and buttonhole handles.  Figuring if I ended at the top with the brick red yarn that had a heftier hand for worsted yarn, I might have a bag that would be sturdy enough for a knitting project.  I used the new pattern as inspiration only as I was working from the base up.


Figuring that I needed enough height to prevent the base from pulling up, I continued knitting until the my bag was 15 inches tall.


I chose not to use much of the off-white Lion Brand Fisherman's Wool because I was unsure how well it would felt/full.  The variegated yarn in the base is the same but dyed with Kool-Aid.  I was pleased to find that it is very densely felted and with only one cycle in my top-loader.

The felting/fulling process began with soaking the bag in a pan of warm water with 2 cups of white vinegar to soften the yarn.  After 40 minutes in the vinegar bath, I dumped the bag in a bed pillow cover with a zipper (past felting experience in only a mesh bag resulted in much wool lint clogging our 60 year old pipes requiring a visit from a plumber) and put it in my top loading washer with a heavy navy towel.  On the lowest water level with very hot water, the contents of that load went through a very turbulent agitation for 9 minutes, followed by a cold rinse.  

The results was very satisfactory.  The bag is now 10 inches high and 32 inches in circumference and stuffed  with a round bowl in the base and nearly all the plastic shopping bags I could find in the house.  Drying may take awhile, though.  Our pleasant sunshine is now drippy rain.  I may have to set up a fan to speed up the process.

If you would like more details on how to make the bag, download the pattern/instructions:  Round Bottom Buttonhole Handles Bag

While I am posting on my project, I am going to use some space to comment on the terms felting and fulling.  If one wants to be terribly accurate and base their word usage on the ancient process of thickening woolen fabrics after weaving, fulling is the correct term.  Felting actually is the matting together of non-woven fibers.  Unfortunately, word usage changes the meaning of words and now, knitters commonly refer to felting knits to make them denser and sturdier.  One would have a hard time finding a current book on the process using "fulling" in the title.  Felting communicates as few understand fulling and its history in the textile industry. 

June 21, 2013 Update:  Recently, the bag was soaked in Shaklee's Basic H and hot water for a half an hour and then agitated again.  The bag is now smaller and is stiff enough to stand on its own.  Petite but the bag is now a perfect small project bag at about 7 inches tall and 6.5 inches across the base.  The pattern recipe has not been updated with new pictures.


With a recent gift of off-white wool yarn lurking in my stash, dying and felting another bag are tempting me.  A perfect project for lazy summer days!  

Friday, April 13, 2012

Veggie Bag Dispenser


For two days we had Re-Bath of Oregon tearing apart our bathroom and putting it back together.  While they worked, I knitted.  The results was a Veggie Bag Dispenser inspired by the pattern for a doggie poo-bag dispenser first published in Bark magazine and now posted at Facebook.

I used inexpensive Red Heart acrylic yarn in worsted weight with size 9 circular needles, cast on the 48 stitches and allowed 2 inches for the roll top before the eyelets, then knit even for about 16 inches, decreased to 24 stitches, and ended with 2k, 2p ribbing for an inch. I twisted yarn for a tie that is also the hanging loop. The colors are perfect for my kitchen; matching my curtain topper and the potholders Debra Burgess made me in the Treadle On Potholder Exchange for Machines of Color.

The veggie bags will have an attractive hiding place while they wait to be used for dirty diapers.  I intend to make another for plastic grocery sacks but increase one stitch in the 2nd round after the eyelets, centering the increase between them. The dispensing hole will remain the same at 24 stitches and 2 by 2 ribbing.

The yarn was extremely coarse feeling with little resilience.  It almost seemed like it was over heated in the processing of the fiber. I have never had Red Heart acrylic yarn with such a poor hand but it won't stop me from using more for utility type projects.

Thursday, March 8, 2012

EQ7 and Indy's Quilt

Exported Image from EQ7
Some of you know I plan my quilts with EQ7.  So, you must be wondering what I saw when I decided to go with the layout for Indy's quilt.  The colors were similar but not the exact fabrics I had selected.  It was not apparent that the orange was so intense and that the yellow would wash out.  Maybe it was noticeable when I stacked them for a preview to determine the order to use in EQ, but seeing it on the screen was what sold the plan.  Next time, I will try to use closer colors in EQ and consider my preview stack to be my most important factor for fabric selections.  Traditionally, the Rail Fence quilt works best with darkest or most intense color fading to the lightest.  The two block version I made for my mom is an example of the dark to light arrangement.

Sunday, February 19, 2012

A Quilt for Indy

Some things just aren't perfect in life and this is one of them.  If I could remake this quilt top, I would start with the fabrics.  The yellow needs to be brighter and the orange overpowers the red.  It is just too much!  Next, I cut all the strips in the blocks on the lengthwise grain.  I know, you real quilters say that is best, but only one, the turtle/snail theme fabric needed to be on the lengthwise grain.  The rest didn't matter and they would have had the give to help me match the rows at the block joins much better if I had cut them on the crosswise grain.  Using a Shape Cut to cut the strips didn't help either.  The slits wobble, producing slight irregularities in the width of the strips.  I will only use that tool for cutting strips for placemats, not for quilt blocks where they have to match precisely.  But with all its imperfections, it is a quilt that my new grandson can drag around until it is thread bare and gramma will make a new one.  ;)

Saturday, January 28, 2012

Craftsy Classes

Craftsy Block of the Month 

I have signed up for 2 online classes at Craftsy.  It's a great online learning environment.  The class handouts are nicely formatted and you can always go back and review lessons.  The classes never close.  Now to get to my homework.  ;)