Sunday, December 8, 2013

Hanukkah Center Piece Mats


Last year's Hanukkah sale fabric from Nancy's Notions is out of the stash and all sewn up into Hanukkiah mats.  A pattern for an octagon shaped center piece mat inspired me to draft a hexagon and use it as my base in these quilted table mats.  The largest is approximately 18 inches across from side to side and the smaller ones are about 10 inches. 

Kaye Wood's Starmaker 6 Ruler made quick work of drafting the center for the large table mat and for the smaller trio, I used the EZ Hexagon Template.  The Hex N More! Ruler would work just as well but I need to get to Fabric Depot with a coupon when they have them in stock.  The Park Bench book in my library is calling my name so that may be encouragement to spend some $$ and time to pick one up on my next trip to the city.  I am seeing all sorts of Hanukkah table runners and Hanukkiah mats from that little treasure.

Karen's Table Runner

Karen doesn't sew but her JoAnn's was moving to a new location and the fabric department was selling out to make the move easier.  She loved this Hanukkah fabric so she asked me to make her a table runner.

The center is a WOF of fabric cut (selvage to selvage) approximately 14 or so inches wide.  The border strips were cut 2.5 inches wide.  Next time I make a table runner like this, I might add some inner accent strips but I was sick with the 4 week coughing plague so I didn't get out for more fabric.  Even though the Hanukkiahs were printed off grain, the runner looks great with a center piece on it.

Friday, December 6, 2013

WOF Table Runners

Since Hanukkah table runners and centerpiece mats have consumed my recent creative time I thought I would share them.  

This one I saw in a picture and thought I could manage it without the kit since it was out of stock.  So in a nutshell, I estimated the strip widths and was very happy with the results.  To make your own, add seam allowances and cut strips from selvage to selvage (WOF).  The center finishes 7 inches, the narrow strips are 1 inch, and the border strips are 1.5 inches.  Layer the runner top with backing fabric and Pellon Fleece and sew and turn.  The finished table runner is 12 inches wide by 42 inches long and quilted in the ditch of the seams.  EZPZ!

Another WOF (width of fabric) runner will be added soon.  Stay tuned!

Thursday, October 24, 2013

Quilting Duet

A new sewing machine, another grand-baby on the way, and a request for a quilt inspired this joint project made with a dear friend.  With little time to shop together, I offed the kit from my stash and assistance with piecing and quilting.  Our project will be presented to the new family member this weekend.  Hope we have more excuses to collaborate.  

AmysCreativeSide

Tuesday, September 3, 2013

Nesting Chinese Pagoda Boxes

These handy fabric boxes will be one of the quick projects offered at the Dundee TOGA in September.  Traditionally they are made to fold flat and secured as boxes with a loop and Chinese knot.  Missionaries to China have blessed me a few that are handy for small clutter in my office and sewing area.   Click here for a PDF version.

Chinese Pagoda Boxes

(so named for the appearance they have when evenly filled with clutter and stacked on my desk)

Photo enhanced instructions or variations for securing the corners (the first is was the inspiration for the TOGA class):


or directly to the pdf: 


More:


Snaps or the traditional Chinese loop and knot are also ways to secure the corner, allowing for flat storage and transport.  Fusible vinyl can be used to make the inside water resistant.  These boxes can be made square or rectangular.  The key to the corner and depth is the square corner that determines the stitching line and fold line.  Coordinating fat quarters and layer cake squares are ideal for the project but the box measurements may vary from those suggested below.

"         For square nesting boxes, cut 2 squares of fabric and one stiff fusible interfacing (Pellon Décor Bond): 

o        Fabric:  2 @ 7.5“ (4 inch box, 1.5 inches deep)  Interfacing:  1 @ 7”

o        Fabric:  2 @ 10 “ (6 inch box, 1.75 inches deep)  Interfacing:  1 @ 9.5”

o        Fabric:  2 @ 12.5” (8 inch box, 2 inches deep)  Interfacing:  1 @ 12”

"         Center and fuse interfacing to the fabric that will be the inside of the box.  Follow manufacturer’s instructions for method and recommendations.  Pre-washed fabric pressed with no starch fuses best.

"         Right sides together sew squares together with a ¼ inch seam allowance (follow edge of interfacing).  Leave an opening on one side to turn.

"         Trim corners, turn and press.

"         Topstitch 1/8 inch around all edges of square.

"         Mark the same size square in all corners as suggested in cutting instructions for depth). 

"         Fold on the diagonal of the square to match edges of box at each corner and sew to secure the corner on the marked line(s).

"         Congratulations!  You are done!

Saturday, June 15, 2013

Lurking but Productive

It's been too long!  I have been lurking in the shadows productive but silent.  Knitting, sewing, and quilting have been my diversions since my last post.  

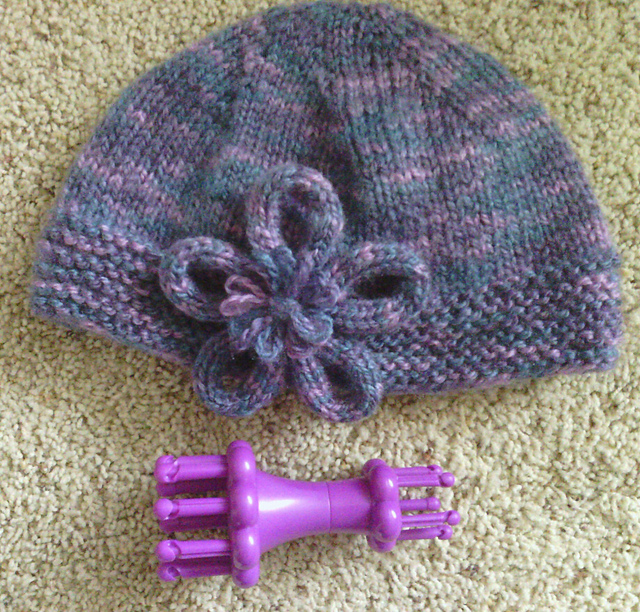
Knitting seems to keep my hands busy when I don't want to start a big project or go down and heat up my sewing area in the basement.  Here is a recent hat I made for a charity project with some donated Lion Brand Jiffy yarn.  The large knitting knobby/spool makes a cute flower embellishment.


And a cowl from Turvid's one row lace scarf pattern to match:


The hat is a top down adaptation of a pattern from Ravelry called The Republic Hat by Nicole Reeves.  I tried using a long tail cast-on for socks, using just 7 stitches.  The sock cast-on is easier to manage with 2 24 inch cable needles than the usual cast-ons for top down hats.  If the knitting inspector doesn't look closely, they never notice.  ;)

The cowl is 24 stitches on size 11 needles.  I knit until I had 27 inches then finished off the piece as instructed for a scarf.  With a 180 degree rotation on one end, I whipped stitch both ends together, stitch for stitch.  The pair make a classy looking gift for anyone or those confined to wheelchairs who feel drafts indoors any season.

Last week's sewing project used up a one yard remnant of fabric.  I now have a curtain and valance to dress up the small room/side entry off the kitchen.  

Last Sunday, I warmed up the HQ 16 and quilted Indy's quilt.  Now binding and special label are all that remain to that project that is as old as he, 17 months tomorrow.

With 4-H quilting camp coming up, I hope to have some lovely quilts to show off for the next entry.