Sunday, October 28, 2012

BIG B, little b: What begins with B?

Baby's ball!
https://blogger.googleusercontent.com/img/b/R29vZ2xl/AVvXsEhqaAhvk_O_DpXWyoeRueVRiBxmIZi54xf1cRasHN37GiGRRB9GIsTAcw-pdnpom6lecAUVhjJFwgFfKM9O1oskd7pHxpihFGOP4w_eQkA8FNVUn2PdAa1bE3ztXOZ6ur5Xqc9gUec-UVsJ/s512/Ball1.jpg
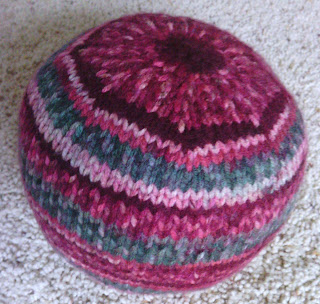
With fond memories of a crocheted ball a neighbor made my children when we lived in NE Portland in the '70s, I went looking for a pattern to knit a ball for my youngest grandson.  My search took me to Judy O'Brien's free pattern.  Her pattern is for sock yarn but with a couple of modifications, I thought it might work in this lovely self striping worsted that is virtually fuzz free.  After making the first ball, my own pattern emerged so I am offering it for you all to try. 

Finished Size:  About 18 inches in circumference

Supplies and Notions:
Self striping worsted weight and fuzz free anti-pilling yarn*
US 6 needles (double points or 2-24 inch circulars)
One or two stitch markers
Tapestry needle
Polyester Fiberfill
Gauge:

5-5 ½ spi  (specific gauge is not important, only that it is very tight so baby cannot pull out fiberfill)

Instructions:
Using Emily Ocker’s cast on: CO 4 stitches and divide evenly onto 2 circular needles, leaving an 8 inch tail.

All even rounds are knit.  Use a stitch marker to designate beginning of round.
Rnd 1:  K1fb around (8 sts)
Rnd 3:  K1, M1 around (16 sts)
Rnd 5:  K2, M1 around (24 sts)
Rnd 7:  K3, M1 around (32 sts)
Rnd 9:  K4, M1 around (40 sts)
Rnd 11:  K5, M1 around (48 sts)
Rnd 15:  K6, M1 around (56 sts)
Rnd 17:  K7, M1 around (64 sts)
Rnd 19:  K8, M1 around (72 sts)
Rnd 21:  K9, M1 around (80 sts)   
Rnd 22:  Place a stationary marker at the beginning of round and knit even for about 26 rounds.

Decrease to close ball.  All even rounds are knit until round 18. 
Rnd 1:  K8, K2tog around (72 sts)
Rnd 3:  K7, K2tog around (64 sts)
Rnd 5:  K6, K2tog around (56 sts)
Rnd 7:  K5, K2tog around (48 sts)
Rnd 9:  K4, K2tog around (40 sts)
Rnd 11:  K3, K2tog around (32 sts)
Rnd 13:  K2, K2tog around (24 sts)  Start stuffing ball with fiberfill.
Rnd 15:  K1, K2tog around (16 sts)  Continue stuffing ball.
Rnd 17:  K2tog around (8 sts)  Make sure ball is firmly filled with fiberfill.
Rnd 18:  K2tog around (4 sts)

Cut yarn, leaving an 8 inch tail.  Run yarn through the loops with a tapestry needle and remove knitting needles.  Pull yarn tight and run through loops again to fasten off.  Hide end inside ball.


*I Love this Yarn! from HobbyLobby or Deborah Norville Everyday Soft Worsted are good easy care choices for this project.


Monday, October 15, 2012

Another Pumpkin Joined the Patch

Jack-o'-Lantern Bib

I have been waiting for the opportunity to make this bib.  It's fall, I love faces on pumpkins, and my little 9 month old grandson looks great in orange so with a little free time on my hands, I just had to whip it up.   Indy will be with me on Friday so maybe we'll even have a live model for a photo shoot. 

The design of the neckline is particularly practical since the bib extends to shoulders but tapers in for the chest.  When Indy turns his head, he won't rub food on his shirt, a problem I have noticed with the design of the bibs he currently wears.  I intend to incorporate this design feature into future longer bibs with food pockets for everyday wear.  If you need a freebie bib to embellish for the holidays, there are plenty on the internet.  You might check out this blog for more ideas and a pattern:  Just Another Hang Up

This Jack-o'-Lantern Bib pattern is also in Quick Creative Quilting, a book I have had on the shelf for years.  The book currently appears to be a bargain at Amazon so for the price of shipping, you would have many more patterns than just the one for the bib.  And please note that the neckline runs small on this pattern. 

Update:  I just found another great bib pattern in a Sew Daily freebie.  It runs longer, with a larger neck opening (and some cute fruit and veggie appliques); perfect for the toddlers on your sewing list:  Sew Daily (4 Free Easy Sewing Patterns)

Monday, September 24, 2012

Pumpkin Patch Hats

Callum's Hat

Helen's Hat

Indy's Hat
The family is gathering for a fall cookout and all the little ones have pumpkin patch hats.  Callum's hat is Rib-A-Roni:  http://www.ravelry.com/patterns/library/rib-a-roni

From some of the comments on Ravelry, there were a few that said Rib-A-Roni ran small.  I made the youth size making gauge at one rib per inch for a 3 year old and it is small.

Helen's Hat is Spiralini adapted for an 18 month old:  http://www.ravelry.com/projects/myshellyknit/spiralini-hat

This one runs large due to the slouch and my gauge.  I started with 72 stitches (4 spi) in the ribbing and then increased to 80 stitches for the body, knitting even for a total of about 5.5 inches for the length before decreasing.  The decreases are based on a 10 stitch repeat so there were no further changes.  If I had been thinking, I could have changed the swirl to a 8 stitch repeat.  That would have resulted in more sections but the swirl lines would have lined up with the ribbing like the designer's.  Helen's curling vines are crocheted.

Indy's hat is has a roll brim with 64 stitches (4 spi).  After the 2 inches of deep orange in stockinette, there is an 7x1 rib (knit 7 stitches, purl 1).  Total length before decreasing, is 5 inches.  This hat runs a bit small for this 9 month old but I have enough yarn to make another one for next year.  ;)

Hopefully, Callum's and Helen's hats will fit and we'll have a Pumpkin Patch Kids picture.

Update:  The day for the cookout was too warm for hats.  Callum politely refused to pose with Helen and Indy, so the picture below is my consolation.  Callum's hat ran small and Helen's is a bit large, most likely she will be able to wear hers next fall, too.

Tuesday, August 28, 2012

I Dyed for Fishy

KoolAid dyeing in a crockpot is fun and easy.  Colors that are analogous (next to each other on the color wheel) will blend better with less muddying.
Brew mix.


Dye before setting to brew (yarn soaks and heats in 2 cups white vinegar and water to cover yarn, dye is added when hot).
Squirt bottles used to insert dye in water bath.
Brewed yarn:  Water turns clear or milky in the hot bath when the yarn has absorbed all the dye.
3 oz. of dyed Lion Brand Fisherman's Wool
Fishy (free pattern from Delicious Stitches) before swim.
Fishy after swim, drying in front of a small fan.
Fishy took some hard hits but with a little reshaping, he is looking much better. 

Tuesday, July 31, 2012

Can this be knitting?

Yarn Bee Chrysalis in Bog Copper from Hobby Lobby
Netted ribbon yarn is not my fiber of choice but I accepted the challenge of a friend and now a scarf of layered ruffles is falling from my needles.  The work is tedious with each loop having to be spread open to hook it with the knitting needle to become the next stitch.  Don't drop a stitch, picking them up is a challenge if not impossible.  I started over, once, already.  See if I do another one!

Dilemma: Ready to Felt/Full?

16"x16" in Full o'Sheep Yarn
My Amish Jewels version of the Painted Diamonds Bag is ready to felt/full.  I-cord handles have been twisted and tied with a square knot.  Should I leave them twisted or undo them and twist them after the bag has been processed?  I am leaning towards leaving them twisted through the water bath.  Any thoughts or recommendations from experience?

Update:  Today, August 28th, was felting/fulling day.  The bag was processed with the handles twisted.  They didn't stick to the bag and they can be separated to be twisted again.  Some thought they might untwist with the vigorous agitation.  They may but they are just as likely to twist more.

Also, some recommended securing the handles with additional stitches.  I did this and I tied them before twisting.

Bag is now 13.75 inches wide by 13 inches tall.

Handles stretch when hung damp to dry.

Thursday, July 12, 2012

Sticky Situation

I was blessed with a Singer Puzzle Box a week or so ago but something sticky had adhered to the surface.  From a telltale hair and previous experience with a Singer 128 from a barn with similar spots inside the base, I suspected mouse droppings.  To remove the rather large splotches in the 128 base, I soaked them with oil and scraped with a putty knife.  To cover the oily spots, I put in a nice new piece of black felt.  That process wasn't going to work for a nice looking Puzzle Box with a decent finish.
The picture above shows the worst of the droppings and two spot faintly circled in red that were test spots for cleaning products. 
Since I had used oil on the Singer 128 base, I thought maybe something oily might work but it had to have more solvent action than just oil.  Since the Treadle On members are adept at cleaning old treadles stored in unusual places, I asked for suggestions.  Murphy's Oil Soap, Paul's Elixir (a specialty home brew that seems to work similarly to Dr. Woodwell's)*, and OxiClean.  I put Paul's Elixir as a last resort because it will soften the finish on the wood and redistribute it.  If the droppings were embedded in the finish, I would need to use it to blend in the spots where the finish lifted.

I didn't have any Murphy's Oil Soap and I was afraid the oxygen peroxide created by mixing the OxiClean in hot water would cause discolorations.  So, looking through my own multitude of cleaning products for an oil base cleaner that would act like the wood oil soap, I turned up two, Ultra Krud Kutter and De-Solv-It.  I tested both but the organic De-Solv-It was more effective at softening the spots.  Even so, I still had to lift them with a flat blade screw driver and then smooth the area with fine steel wool.  They came off, but they took some of the finish with them.  Eventually, I will have to use Paul's Elixir to restore the finish but since the biggest spot is on the section that is usually sitting on the bottom when the emblem is upward, the box is now nice enough to display in my office near the Singer treadle cabinet.
*Note:  Paul Hayes (the Fenman) has an extensive article at Needlebar.org.  Chapter 4 of the article specifically demonstrates The Elixir while to rest of the article is worthwhile for understanding the pros and cons restoration.