
Sunday, February 19, 2012
A Quilt for Indy
Saturday, January 28, 2012

Wednesday, December 7, 2011
Keeping Warm
Has it really been nearly 6 months since I last posted? WOW! The great move has been so distracting, I haven't been doing my usual sewing and knitting. Now, with winter just around the corner, scarves have been on my mind and finally on my knitting needles.
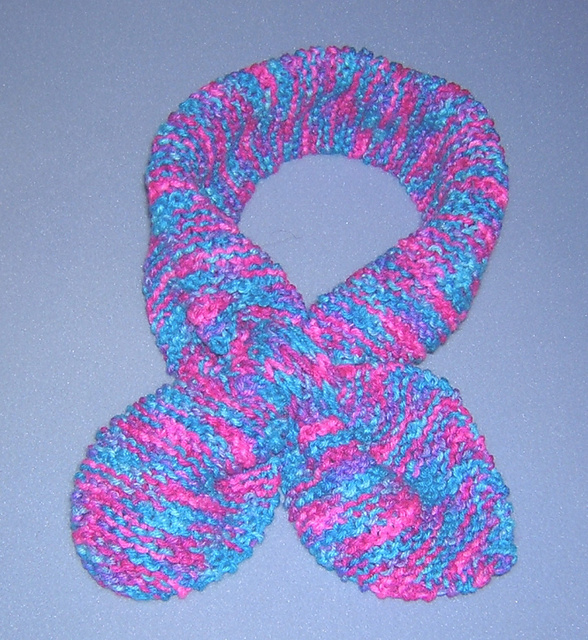
 This little scarflette was an enjoyable weekend project that will likely become a repeat. I will make some changes in the keyhole opening, though. I prefer dividing the stitches to make an opening between 1x1 ribbing.
Right now, a version of the potato chip scarf is on my needles. While some can't make just one, I am finding the endless short rows too boring. I think this one is my last.
Want to knit one of my favorite scarflettes? I have been making this one since we took up cross country skiing in the 80's. The design was from a couple of scarves my mom had when we lived in Winchester, New Hampshire. I don't remember wearing either after my family started moving around. My mom had forgotten them but I found the style so fascinating and practical for skiers that I just had to create the pattern from memory. By the size of the scrap bag I gave away on freecycle this summer, I must have knit and given away hundreds since that first one I recreated with a skein of worsted weight yarn.
Saturday, June 25, 2011


Thursday, April 14, 2011
Sugarless Treats: Crayon Cookies and Kool Aid Playdough


Just peel the crayons, break them into pieces, and group them by color families in the molds (no need to use a cooking spray if you have a freezer). Preheat the oven to 200 degrees and place pan in oven for 15 minutes. The silicone candy mold will need a baking sheet under it to keep it flat. Check at about 10 minutes to make sure you have enough broken crayons in the mold, if not, add more. The silicone molds take longer to heat the crayons to melting point. When, melted, turn off oven and open door. Let the crayons cool until set around the edges, then cool on the counter until set (I put mine outside). When set, put tray in freezer until cold. The crayons will slide right out of the pan or pop out of the silicone molds. Look for inexpensive silicone molds at a dollar store and use only quality, non-toxic crayons. The silicone may absorb some of the dye from the crayons so don't use a borrowed tray. And you will need a fair amount of crayons. The box in the right picture was filled.
For the playdough, plain inexpensive bleached flour, salt, and a light colored cooking oil will make the most vibrant colors but you may want to have some extra liquid food coloring on hand.
Kool-Aid® Playdough
1 cup flour1 package unsweetened Kool-Aid®
1/4 cup salt
2 tablespoons cream of tartar
1 cup hot water
1 tablespoon vegetable oil
Mix flour, salt, cream of tartar, and Kool-Aid® together well with a fork in a medium pan. Add hot water and oil. Stir over medium-low heat 3 to 5 minutes. When mixture forms a ball in the pan, remove. Knead until smooth. Put in a plastic bag and refrigerate. Dough is smooth, non-sticky, and smells nice.
Mix flour, salt, cream of tartar, and Kool-Aid® together well with a fork in a medium pan. Add hot water and oil. Stir over medium-low heat 3 to 5 minutes. When mixture forms a ball in the pan, remove. Knead until smooth. Put in a plastic bag and refrigerate. Dough is smooth, non-sticky, and smells nice.
Tuesday, December 14, 2010
Another Two Done, One to Go!
My mom has put in requests for three aprons. One was easy. She had me copy a chef's style apron that fit her well. I made the first one last year and completed another last month. The next request was a challenge.
 When I saw her for her birthday in October, she had an ad for a smock type apron. With the renewed popularity of aprons, you think it would be easy to find a pattern for a smock but googling didn't bring much success and none were in the pattern books for the major companies, either.
With the help of some internet friends, I located a vintage Kwik Sew pattern for a zip front smock. It didn't have a yoke, gathers, or buttons; but with a picture of a pattern insert from another vintage pattern, I made adaptions to the Kwik Sew pattern and now my mom will have her smock.
 Next, but with no immediate pressure, will be an apron she can wear next fall and on Halloween when she answers the door to trick or treaters. Mom used to dress up as a witch until she scared her one and only a few years ago in her old neighborhood. Since she moved, her new location is very popular and she lamented she wished she at least had a special apron for the occasion.
 The toddler apron is for the cutie who smiles at you up in the corner. My daughter is giving him some small but real cooking utensils for Christmas. I promised a chef's apron. I need to complete a matching hand towel, next.
If you like the embroidery design, you can find it at Embroidery Library. This is from a set for the "fruits of the spirit." They offer the design for both small and large hoops. I reduced the design from the large pack to fit the pocket with no problems.

With the help of some internet friends, I located a vintage Kwik Sew pattern for a zip front smock. It didn't have a yoke, gathers, or buttons; but with a picture of a pattern insert from another vintage pattern, I made adaptions to the Kwik Sew pattern and now my mom will have her smock.


If you like the embroidery design, you can find it at Embroidery Library. This is from a set for the "fruits of the spirit." They offer the design for both small and large hoops. I reduced the design from the large pack to fit the pocket with no problems.
Saturday, November 27, 2010


Subscribe to:
Posts (Atom)